Plum tart
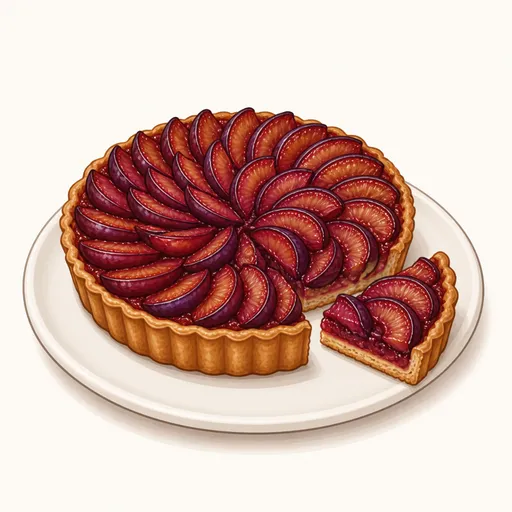
Plum tart is a late-summer favorite all over Germany, France and Austria. Plum slices are lined up snugly like fish scales on a crisp butter crust, and as the tart bakes, the plums soften, release their sweet-tart juices and turn a brilliant reddish purple, with a warm hint of cinnamon.
- Difficulty
- Easy
- Prep
- 35 min
- Cook
- 50 min
- Rising or chilling
- 1 hr 30 min
- Total time
- 2 hr 55 min
- Method
- Oven-baked
Ingredients
Butter crust
Juice-absorbing base layer
Plums
Glaze
Instructions
Step 1
Rub 110 g cold unsalted butter into 200 g all-purpose flour, 60 g powdered sugar and a pinch salt until it forms fine crumbs, then add 40 g egg yolks and 15 g cold water and quickly gather it into a ball. The yolks give the crust a lovely golden color and a crisp, cookie-like texture. The dough is ready when it just holds together, is smooth and has no loose dry crumbs.
Step 2
Shape the dough into a flat disk, wrap it in plastic wrap and refrigerate for about an hour. Chilled, rested dough rolls out more easily and holds its height up the sides of the pan as it bakes. The dough is ready when it's firm, cool to the touch and doesn't stick to your fingers.
Step 3
Roll the dough into a circle about four millimeters thick, line a 24 cm tart pan with it, trim off the excess, prick the bottom, then sprinkle evenly with 40 g almond flour mixed with 20 g granulated sugar. This almond layer soaks up the juice the plums release so the bottom of the crust doesn't turn soggy. The pan is ready when the crust covers the bottom and sides and the almond flour is spread in a thin, even layer.
Step 4
Wash 700 g plums, halve and pit them, cut each half into four wedges, then toss gently with 60 g granulated sugar, 10 g cornstarch and 2 g ground cinnamon. The cornstarch thickens the plum juices into a glossy sauce instead of letting them run thin. The plums are ready when the wedges are evenly coated in cinnamon sugar and haven't yet released much juice.
Step 5
Stand the plum wedges up at an angle, skin side up, in concentric circles from the outside in, each wedge overlapping the one before. Pack them closely, since the plums shrink as they bake and any gaps will show the crust underneath. The top is ready when the plums cover the bottom completely, fanned out like flower petals.
Step 6
Bake on the lower rack of a 190°C oven for about 45 to 50 minutes. The lower rack crisps the crust while the heat gradually rises to soften the plums and thicken their juices. The tart is done when the crust edge is golden brown, the edges of the plum wedges are slightly charred and the juices are bubbling thickly.
Step 7
Warm 40 g fruit jam with a little water, brush it over the plums while the tart is still warm, then let it cool for about thirty minutes before removing it from the pan. The jam gives the top a beautiful shine and keeps the plums from drying out. The tart is finished when the plums are glossy, the juices have thickened and the crust comes away from the sides of the pan easily.
Equipment
- Oven
- Tart pan
- Rolling pin
- Mixing bowl
- Kitchen scale
- Plastic wrap
- Pastry brush
- Wire cooling rack
Tips
- Just-ripe plums with firm flesh and a little tartness give the best results, because they keep their wedge shape in the oven.
- You can replace the almond flour base layer with finely crushed cookie crumbs or dry breadcrumbs.
- Serve with whipped cream or a scoop of vanilla ice cream to balance the tartness of the plums.
Storage
The tart is best on the day it's baked and can stay at room temperature until evening. After that, cover it tightly, refrigerate for up to three days and rewarm it in the oven for about five minutes to crisp the crust again.
Common problems and how to fix them
- The bottom of the tart is soaked with plum juice.
- The absorbing base layer was too thin or the plums were overripe and very juicy. Sprinkle on more almond flour and choose plums that are still firm.
- The crust shrank and slid down the sides of the pan.
- The dough wasn't chilled long enough or was stretched while lining the pan. Let the dough rest in the fridge longer and press it gently into the pan instead of stretching it.
This recipe is based on the common ratios for this bake and is written entirely in our own words.