Mille-feuille
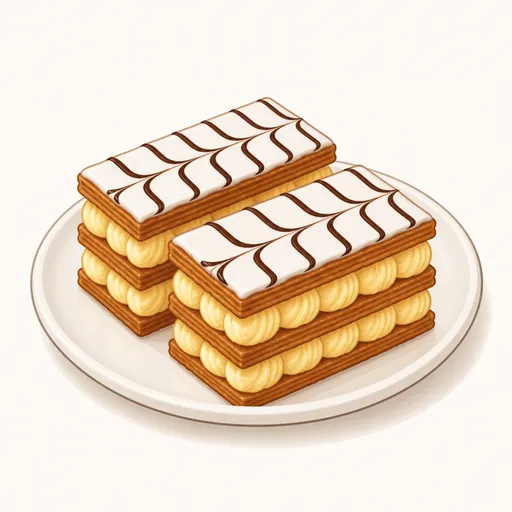
Mille-feuille, which means "a thousand leaves," is made of three layers of crisp puff pastry with two thick layers of silky vanilla pastry cream in between, topped with white icing feathered with chocolate. The pastry is baked under a weight so it stays thin, even and shatteringly crisp all the way through. It's a dessert that takes patience, but you'll feel proud when it's done.
- Difficulty
- Very hard
- Prep
- 2 hr
- Cook
- 40 min
- Rising or chilling
- 6 hr
- Total time
- 8 hr 40 min
- Method
- Oven-baked
Ingredients
Base dough (détrempe)
Butter block for laminating
Caramelized sugar topping
Vanilla pastry cream
Icing and chocolate
Instructions
Step 1
Mix 300 g all-purpose flour with 6 g salt, add 140 g cold water and 30 g melted butter and knead quickly into a ball, then cut a deep cross into the top. The détrempe (the base dough before the butter is laminated in) needs only a brief knead so it doesn't become too elastic. The dough is ready when it's fairly smooth and holds the cross-shaped cut.
Step 2
Wrap the dough tightly and refrigerate for about an hour. Resting relaxes the gluten so the dough won't shrink back when rolled. It's ready when it's evenly cold and the cuts have opened up slightly.
Step 3
Place 200 g cold unsalted butter between two sheets of parchment paper, then pound and roll it into an evenly thick square about 15 cm across. A pliable, flat butter block spreads evenly between the layers of dough. The butter is ready when it bends slightly without cracking and still feels cold.
Step 4
Open out the four flaps of the cross-shaped cut and roll them into a four-pointed star, leaving the center thicker, then set the butter block in the middle and fold each flap over to enclose it completely. A thicker center keeps the butter from poking through when you fold the flaps over. This step is done when the butter is sealed inside like a neat, sturdy square parcel.
Step 5
Roll the parcel into a strip about 60 cm long, fold it in thirds, turn it ninety degrees, then roll and fold it in thirds once more; press two fingertip marks into the top to keep track and chill for one hour. Two turns in a row build the foundation of the layers while the butter is still cold enough. The dough is ready when the edges are square and no butter is breaking through the dough.
Step 6
Place the dough with the folded edge on your left, roll and fold it in thirds twice as before, mark it with four fingertip marks and chill for one hour. Marking the number of turns keeps you from losing count over several hours of work. The dough is ready when it rolls out smooth and even in color.
Step 7
Make the last two turns, wrap the dough tightly and chill for one more hour. After six turns, the dough has more than seven hundred alternating layers of butter that puff into a thousand leaves. It's ready when it's firm and cold and no longer springs back when pressed.
Step 8
Heat 600 g whole milk with the seeds and pod of 4 g vanilla bean. Whisk 110 g egg yolks with 130 g granulated sugar and 50 g cornstarch, pour in the hot milk, then cook over medium heat, stirring constantly. When the cream boils, cook for one more minute, then turn off the heat, fish out the vanilla pod and stir in 50 g unsalted butter. The cream needs to be thicker than usual so the layers stand up straight. It's ready when it's very thick and glossy and holds its shape when scooped.
Step 9
Spread the cream on a tray, press plastic wrap directly onto the surface and refrigerate for about two hours. Only thoroughly chilled cream is firm enough to pipe into even rows. It's ready when it's evenly cold and turns smooth and pliable when whisked again.
Step 10
Roll the dough into a rectangle about 32 by 42 cm and three millimeters thick, set it on a baking sheet lined with parchment paper, prick it all over with a fork and refrigerate for twenty minutes. Pricking helps the pastry rise evenly into thin layers instead of puffing up high. The sheet is ready when it's flat, cold and doesn't shrink at the corners.
Step 11
Preheat the oven to 190°C and have another sheet of parchment paper and a second baking sheet of about the same size ready. The second sheet goes on top of the pastry so it bakes evenly flat. The oven is ready when the temperature is steady.
Step 12
Lay parchment paper over the pastry, set the second baking sheet on top and bake at 190°C for about 25 to 30 minutes. The weight of the sheet keeps the layers thin and compact, creating the signature shatteringly crisp texture. This step is done when you lift the sheet and the pastry is evenly golden brown and dry.
Step 13
Remove the top baking sheet, sift 30 g powdered sugar evenly over the pastry, raise the oven to 230°C and bake for another 3 to 5 minutes, watching it minute by minute. The sugar melts into a thin layer of caramel that protects the pastry from moisture and adds flavor. The pastry is ready when the top is glossy and amber with no burnt black patches.
Step 14
Let the pastry cool completely, then use a serrated knife to cut it into three equal strips, each about 10 cm wide, trimming the edges neatly. Three equal strips let you stack the layers in a straight line. This step is done when you have three straight-edged strips with no breaks.
Step 15
Spoon the cream into a piping bag fitted with a round tip and pipe rows of cream dots side by side to cover the first strip of pastry, lay the second strip on top, pipe another layer of cream, then top with the third strip, flattest side up. Piping dots keeps the cream layer evenly thick and makes the sides look beautiful. The pastry is ready when the layers stand straight and the cream shows evenly on both sides.
Step 16
Melt 30 g dark chocolate and spoon it into a small piping bag. Stir 160 g powdered sugar with 25 g water into a thick, smooth icing, spread it over the top of the pastry, then immediately pipe parallel lines of chocolate across it and drag a toothpick through them in alternating directions. You have to work quickly while the icing is still wet so the chocolate feathers beautifully. The top is ready when it's covered in smooth white icing with a crisp chevron pattern.
Step 17
Refrigerate the pastry for about an hour, then cut it into eight pieces with a serrated knife, using a gentle sawing motion instead of pressing down hard. Chilling firms up the cream so it doesn't squish out when sliced. Each piece is ready when its three layers of pastry and two layers of cream stay neatly stacked.
Equipment
- Oven
- Rolling pin
- Bench scraper
- Small saucepan
- Whisk
- Spatula
- Piping bag
- Baking sheet
- Parchment paper
- Kitchen scale
- Plastic wrap
- Refrigerator
Tips
- You can use store-bought puff pastry to save time; just roll it thin and bake it under a weight as described.
- If the butter cracks while you roll, leave the dough at room temperature for a few minutes; if the butter turns soft and greasy, put the dough back in the fridge.
- The baked pastry and the cream can be made a day ahead, but only assemble the mille-feuille within a few hours of serving.
Storage
Once assembled, the mille-feuille must be refrigerated and eaten the same day while the pastry is still crisp. Unassembled pastry strips keep for three days in an airtight container, and the pastry cream keeps for two days in the fridge.
Common problems and how to fix them
- The pastry puffs unevenly, thick in some spots and thin in others.
- The sheet wasn't pricked enough or the weighting baking sheet was too light. Prick it densely all over and use a heavier baking sheet; you can also set an ovenproof weight on top.
- The cream squishes out when you slice the pastry.
- The cream wasn't thick enough or the pastry wasn't chilled. Boil the cream for one more minute and let the assembled pastry chill longer before slicing.
This recipe is based on the common ratios for this bake and is written entirely in our own words.