Cherry pie
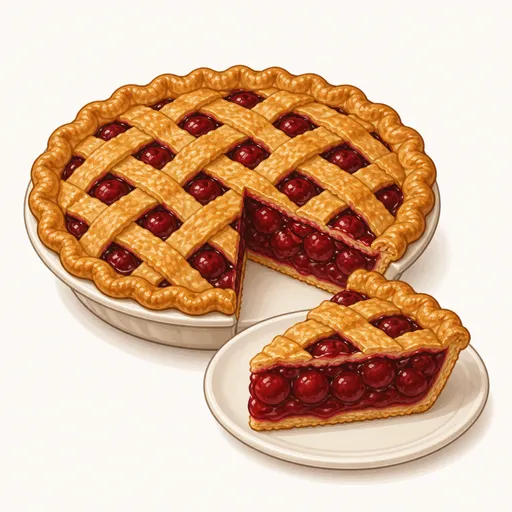
Cherry pie is a classic American dessert, with a flaky, buttery, many-layered crust hugging a deep red filling of sweet-tart, juicy cherries. The top is woven into a lattice to let steam escape and show off the gorgeous color of the fruit. It's best served slightly warm with a scoop of vanilla ice cream.
- Difficulty
- Medium
- Prep
- 50 min
- Cook
- 1 hr 10 min
- Rising or chilling
- 4 hr 30 min
- Total time
- 6 hr 30 min
- Method
- Oven-baked
Ingredients
For the crust
For the cherry filling
For the glaze
Instructions
Step 1
Mix 325 g all-purpose flour, 12 g granulated sugar and 5 g salt, add 225 g cold diced unsalted butter and use your fingertips to press each piece of butter flat into the flour. Then gradually drizzle in 120 g ice water and mix with a fork until the dough just comes together. The flattened bits of butter left in the dough turn into flaky layers in the oven. The dough is ready when a handful squeezed in your hand holds together but you can still see streaks of butter.
Step 2
Divide the dough in two, making the piece for the bottom crust slightly larger, flatten them into two discs, wrap them in plastic wrap and refrigerate for at least an hour. Resting in the cold relaxes the gluten and firms up the butter, so the crust won't shrink when baked. The dough is ready when it feels firm and evenly cold.
Step 3
Toss 1,000 g pitted cherries with 200 g granulated sugar, 35 g cornstarch, 15 g lemon juice and 1 g almond extract, then let it sit for about fifteen minutes. The sugar draws juice out of the fruit to dissolve the cornstarch, so the filling thickens as it cooks. The filling is ready when there's a layer of red juice at the bottom of the bowl and no white streaks of starch remain.
Step 4
On a lightly floured counter, roll the larger disc into a round about 30 cm across, roll it loosely around the rolling pin, then unroll it into a 23 cm pie dish and press it gently against the bottom. Lay the dough in gently without stretching it, so the crust doesn't shrink in the oven. The crust is ready when it covers the whole dish with about two centimeters of overhang.
Step 5
Pour the cherry filling into the crust, holding back some of the juice if there's a lot, then dot the top with 15 g unsalted butter cut into small pieces. The butter makes the filling glossy and gently rich. It's ready when the filling is spread evenly and mounded slightly above the rim, since the fruit will settle as it bakes.
Step 6
Roll the second disc into a round, cut it into about ten strips two centimeters wide and weave them over and under across the filling. Fold the overhang of the bottom crust up over the ends of the strips and crimp the edge with your fingers. The lattice lets steam escape so the filling doesn't bubble over and the top crust stays crisp. The lattice is ready when the strips are evenly spaced and the edge is sealed and neat.
Step 7
Put the whole pie in the fridge for about twenty minutes before baking. Once the butter in the crust firms up again, it puffs into layers in the hot oven instead of melting out. The pie is ready when the strips are firm and no longer soft or sticky.
Step 8
Preheat the oven to 220°C with a rack in the lower position and a baking sheet underneath to catch any filling that bubbles over. A low rack gives the bottom crust strong heat so it bakes up crisp. The oven is hot enough when you open the door and feel a strong blast of heat.
Step 9
Beat 50 g eggs with 15 g whole milk, brush a thin layer over the lattice strips and the edge, then sprinkle 12 g granulated sugar on top. The egg wash turns the crust a glossy golden brown, and the sugar adds a sparkly crunch. The top is ready when it's evenly glossy with no puddles of egg.
Step 10
Bake the pie at 220°C for about 18 to 20 minutes. The high initial heat sets the crust quickly and puffs up the buttery layers. This stage is done when the edge has turned a pale golden color.
Step 11
Lower the oven to 190°C and keep baking for about 40 to 50 minutes, covering the edge with foil if it darkens too quickly. The filling has to bubble long enough to cook the cornstarch and thicken the fruit juices. The pie is done when the crust is golden brown and thick juices bubble slowly through the gaps in the lattice.
Step 12
Set the pie on a rack and let it cool for at least three hours before slicing. The filling needs time to set as it cools; cut it too soon and the juices will run everywhere. The pie is ready when the bottom of the dish is completely cool and a slice holds its shape.
Equipment
- Oven
- Pie dish
- Rolling pin
- Pastry brush
- Mixing bowl
- Kitchen scale
- Plastic wrap
- Baking sheet
- Wire cooling rack
- Refrigerator
Tips
- If you're using frozen cherries, there's no need to thaw them; just add a little extra cornstarch and bake about ten minutes longer.
- Keep everything really cold when making the crust, including the bowl and the water, since butter that melts too early is the main reason a crust turns tough instead of flaky.
- A cherry pitter speeds things up a lot, or you can push the pits out with a sturdy straw.
Storage
Covered with a clean towel, the pie keeps at room temperature for a day. After that, wrap it well and refrigerate it for up to four days, then reheat it at 170°C for about ten minutes to re-crisp the crust.
Common problems and how to fix them
- The bottom crust is wet and soggy.
- The oven wasn't hot enough or the rack was too high. Bake on the lowest rack, preheat the oven longer and make sure the filling is bubbling before you take the pie out.
- The filling is runny and spills out when sliced.
- The filling didn't bubble long enough or the pie was cut while still hot. Next time, bake until you see thick bubbles in the center and wait until the pie has cooled completely.
This recipe is based on the common ratios for this bake and is written entirely in our own words.