Canelés
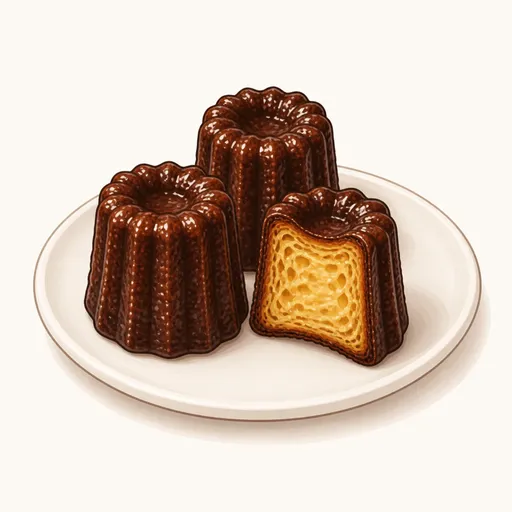
Canelés are a specialty of Bordeaux: small cylindrical cakes with distinctive fluted sides. The deeply caramelized outer shell is crisp and slightly chewy, while the inside is soft and moist like custard, fragrant with vanilla and rum. The batter needs a full day of chilling, so plan ahead.
- Difficulty
- Hard
- Prep
- 25 min
- Cook
- 1 hr 5 min
- Rising or chilling
- 24 hr
- Total time
- 25 hr 30 min
- Method
- Oven-baked
Ingredients
Batter
Mold coating
Instructions
Step 1
Split 4 g vanilla beans lengthwise, scrape out the seeds and put both seeds and pods in a saucepan with 500 g whole milk and 50 g unsalted butter, heat over medium heat to about 80°C, then turn off the heat. Hot milk draws all the aroma out of the vanilla and melts the butter. The milk is ready when the butter has completely melted and the surface is steaming but not yet boiling.
Step 2
In a large bowl, whisk 250 g superfine sugar and 100 g all-purpose flour together. Mixing the sugar with the flour first separates the flour particles so they don't clump when the liquid goes in. The mixture is ready when it's an even color and loose.
Step 3
Beat 100 g eggs with 40 g egg yolks, pour them into the center of the flour and sugar and stir gently into a thick mixture. Stir gently so you don't add many air bubbles, since air makes the canelés puff up and then collapse. The mixture is ready when it's as thick as a paste, smooth and free of flour streaks.
Step 4
Lift out the vanilla pods and set them aside, then slowly pour the still-warm milk into the egg mixture, stirring slowly and constantly. Milk that's just warm blends the batter without cooking the eggs. The mixture is ready when it's as thin as light cream, smooth and free of any cooked bits of egg.
Step 5
Stir 50 g dark rum into the batter, strain it through a sieve into a clean container and drop the vanilla pods back in. Straining makes the batter perfectly smooth, while the pods keep infusing it as it rests. The batter is ready when it's thin and smooth with a gentle scent of rum and vanilla.
Step 6
Cover the container tightly and refrigerate the batter for 24 to 48 hours. The long rest lets the batter hydrate evenly and the gluten relax, so the canelés don't rise up out of the molds as they bake. The batter is ready when it looks uniform and smells more fragrant.
Step 7
Take the batter out of the fridge about an hour ahead, stir gently to recombine and preheat the oven to 230°C with a baking sheet inside. Batter close to room temperature bakes more evenly, and a hot sheet helps the bottoms caramelize quickly. The oven is ready when the sheet inside is thoroughly hot.
Step 8
Melt to taste unsalted butter, brush a very thin layer inside each canelé mold, turn the molds upside down for a few minutes to let the excess drip out, then put them in the freezer for ten minutes. A thin, cold coat of butter gives the canelés a glossy, dark shell and helps them release easily. The molds are ready when they're evenly coated with no drops pooling in the grooves.
Step 9
Pour batter into each mold, leaving about one centimeter at the top, then set the molds on the hot sheet. The headspace gives the canelés room to rise without spilling over. The molds are ready when they're all evenly filled and the rims are free of batter.
Step 10
Bake at 230°C for about 12 to 15 minutes. The high initial heat immediately forms a caramelized crust on the bottoms and sides. This step is done when the canelés start to rise slightly above the rims.
Step 11
Lower the oven to 180°C and bake for about 45 to 50 minutes more; if the canelés rise too high, take the molds out, tap them gently so the cakes slip back down, then continue baking. The long, lower heat cooks the inside to a soft, custardy texture while the shell gradually darkens. They're done when the shell is a deep brown, almost mahogany, and the bottoms are hard and crisp.
Step 12
Turn the molds upside down as soon as they come out of the oven so the canelés drop onto a rack, then let them cool for about an hour. Unmolding while hot keeps the shell from sticking and preserves its crunch. They're ready when the shell is hard and crisp, sounds dry when tapped and the inside has cooled.
Equipment
- Oven
- Small saucepan
- Whisk
- Sieve
- Shaping molds
- Pastry brush
- Baking sheet
- Thermometer
- Kitchen scale
- Plastic wrap
- Refrigerator
- Wire cooling rack
Tips
- Bordeaux bakers often coat the molds with a mix of beeswax and butter for a shinier, crisper shell; a thin brushing of cold butter still gives excellent results.
- Copper molds give the most beautiful color, but silicone molds work too if you bake about ten minutes longer.
- Every oven runs differently, so use an oven thermometer and bake a few test canelés before making the whole batch.
Storage
Canelés are best within a few hours of baking, while the shell is still crisp. You can keep them at room temperature for one day, not in the fridge, and re-bake them at 200°C for about five minutes to crisp the shell again.
Common problems and how to fix them
- The tops are pale and didn't brown.
- The canelés rose up out of the molds while baking. Rest the batter for the full time, fill the molds below the rim and tap them so the cakes slip back down when you see them rising.
- The shell is soft instead of crisp.
- They didn't bake long enough or were stored in an airtight container. Bake until the shell is really dark and let them cool on an open rack.
This recipe is based on the common ratios for this bake and is written entirely in our own words.