Canadian butter tarts
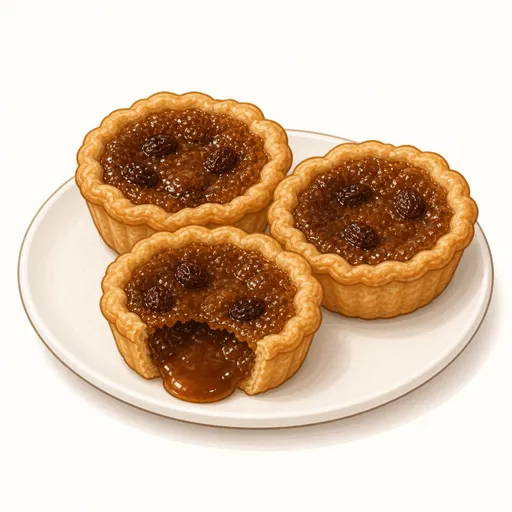
Butter tarts are small tarts considered a culinary icon of Canada, especially Ontario. A crisp, flaky butter crust cradles a filling of brown sugar, butter and eggs baked until just set, slightly crackly on top and soft and runny like caramel inside. Canadians still argue endlessly about whether raisins belong in them.
- Difficulty
- Easy
- Prep
- 35 min
- Cook
- 18 min
- Rising or chilling
- 1 hr
- Total time
- 1 hr 53 min
- Method
- Oven-baked
Ingredients
Crust
Brown sugar filling
Instructions
Step 1
Mix 250 g all-purpose flour, 10 g granulated sugar and 2 g salt, add 170 g cold, diced unsalted butter and rub it in quickly with your fingertips, then drizzle in 60 g ice water and gather the dough together. Small pieces of butter left in the dough turn to steam in the oven, making the crust flaky. The dough is ready when it holds together and you can still see tiny streaks of butter.
Step 2
Press the dough into a flat disk, wrap it in plastic wrap and refrigerate for about an hour. Cold dough lets the butter firm up and the gluten relax, so the crust doesn't shrink as it bakes. The dough is ready when it's firm but your thumb still leaves a mark.
Step 3
Roll the dough about three millimeters thick, cut out twelve rounds with a 10 cm cutter and press them gently into the cups of a muffin pan so the edges stand slightly above the rim. Edges higher than the pan keep the filling from bubbling over. The pan is ready when every cup has an even crust with no holes and natural pleats around the edge.
Step 4
Stir 200 g brown sugar with 120 g corn syrup and 60 g melted unsalted butter, then add 100 g eggs, 5 g vanilla extract and a pinch salt and stir just until blended. Don't beat hard, because air bubbles make the filling puff up and then crack. The filling is ready when it's glossy, as thick as syrup and has no streaks of egg white.
Step 5
Scatter 80 g raisins over the bottoms of the shells if you like, then pour in the filling until each cup is about two-thirds full. Leave some room, as the filling bubbles up in the oven. Each shell is ready when the filling sits about half a centimeter below the rim.
Step 6
Bake on the lowest rack of a 200°C oven for about 15 to 18 minutes. The high heat crisps the bottom of the crust quickly before the filling can make it soggy. The tarts are done when the crust is golden brown, the filling bubbles gently in the middle and the centers only wobble slightly when you shake the pan.
Step 7
Let the tarts cool in the pan for about twenty minutes, then run the tip of a thin knife around the edges to lift each one onto a rack. The filling needs to cool a bit to set, and the tarts break easily if lifted too soon. They're finished when they come out whole, with a thin, crackly skin on top and a soft, runny center.
Equipment
- Oven
- Muffin tin
- Rolling pin
- Cookie cutter
- Mixing bowl
- Whisk
- Kitchen scale
- Plastic wrap
- Wire cooling rack
Tips
- For a flakier, more tender crust, replace half the butter in the dough with lard, as in the traditional version.
- If you like a runnier filling, bake about two minutes less; for a firmer filling, bake two minutes more.
- Chopped toasted pecans or walnuts are a popular alternative to raisins.
Storage
The tarts keep at room temperature in an airtight container for two days. You can refrigerate them for up to five days or freeze them for up to a month; let them come to room temperature before eating so the filling softens again.
Common problems and how to fix them
- The filling boiled over and stuck to the pan.
- The shells were filled too full. Fill them only about two-thirds and keep the crust edges higher than the rim of the pan.
- The bottom of the crust is soggy and wet.
- The oven wasn't hot enough or the pan was too high. Preheat the oven thoroughly and bake on the lowest rack so the bottom gets strong heat.
This recipe is based on the common ratios for this bake and is written entirely in our own words.