Taiwanese pineapple cakes
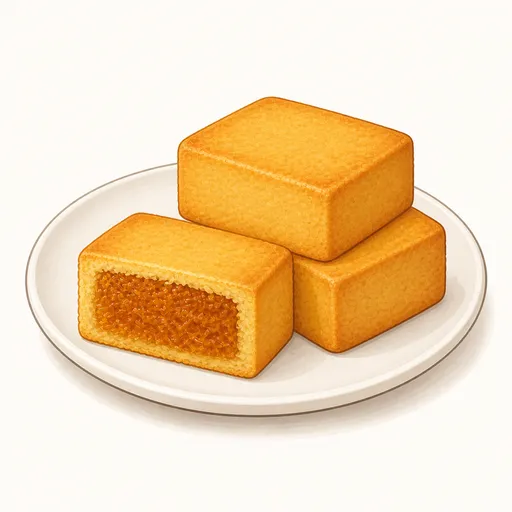
Pineapple cakes are Taiwan's most famous edible gift: golden rectangular pastries with a fine, crumbly crust that melts in your mouth thanks to plenty of butter and milk powder. Inside is a thick, chewy cooked pineapple filling with a lovely sweet-tart balance, often mixed with candied winter melon to make it smoother and less sharp. Left overnight, the cakes turn softer and moister, and the crust soaks up a wonderful buttery aroma.
- Difficulty
- Medium
- Prep
- 1 hr
- Cook
- 1 hr 10 min
- Rising or chilling
- 1 hr
- Total time
- 3 hr 10 min
- Method
- Oven-baked
Ingredients
For the pineapple filling
For the butter and milk crust
Instructions
Step 1
Peel 420 g fresh pineapple, cutting out all the eyes and the hard core, then chop it finely or pulse it briefly in a food processor with 150 g candied winter melon, and press it in a sieve to squeeze out some of the juice. Pressing out the juice shortens the cooking time and keeps the filling from turning mushy. The fruit is ready when it's in loose, fine shreds, moist but no longer dripping.
Step 2
Put the pineapple mixture in a deep skillet with 60 g granulated sugar and cook it over medium heat, stirring steadily; when the filling starts to dry out, add 40 g maltose, lower the heat and keep cooking for about forty-five minutes in total. Adding the maltose later makes the filling chewy and glossy and keeps the sugar from crystallizing. The filling is ready when it turns amber, gathers into a mass that doesn't stick to the pan and can be shaped into balls once cool.
Step 3
Beat 130 g softened unsalted butter with 35 g powdered sugar and a pinch salt on medium speed until lightly fluffy, then gradually add 50 g beaten eggs and keep beating until combined. Moderately fluffy butter makes a crust that's tender and melts in your mouth. The mixture is ready when it's as smooth as cream, ivory in color and not curdled.
Step 4
Sift 200 g cake flour with 30 g milk powder into the butter, then use a flat spatula to smear and mix gently until it forms a soft dough. Mixing as little as possible keeps the crust from turning tough and hard after baking. The dough is ready when it's smooth, as soft as clay and has no streaks of white flour.
Step 5
Wrap the dough in plastic wrap and refrigerate it for about thirty minutes so the butter firms up, and meanwhile divide the cooled filling into sixteen equal balls. Then weigh and divide the crust dough into sixteen portions. Moderately chilled dough won't stick to your hands as you wrap. This step is done when each portion of crust weighs slightly more than each ball of filling and both are evenly round.
Step 6
Flatten a portion of crust dough in your palm, set a ball of filling in the center, then use the space between your thumb and forefinger to gradually push the dough up around the filling and pinch it closed. Working slowly keeps the crust evenly thick with no thin spots that could crack. The ball is ready when it's smooth and round with no filling showing anywhere.
Step 7
Set rectangular molds on a parchment-lined baking sheet, drop a ball into each and use a press to gently push down on both sides so the dough fills the corners of the mold, leaving the molds on for baking. The molds give the cakes their signature square edges. The cakes are ready when the tops are flat, the corners are full and the dough is level with the top of the mold.
Step 8
Bake at 170°C for about twelve minutes, take them out and flip each cake over, still in its mold, then bake for about eight to twelve minutes more. Flipping helps both sides turn evenly golden and stay neatly flat. They're done when both sides are a shiny gold, the edges are lightly browned and the cakes come away from the molds on their own as they cool a little.
Step 9
Let the cakes cool completely on a rack before unmolding them, then store them in an airtight container overnight before enjoying them. During this rest, moisture from the filling spreads into the crust, making the cakes softer and more flavorful. They're ready when the crust is soft and fine, crumbles tenderly when you bite into it and the filling is thick and chewy.
Equipment
- Oven
- Shaping molds
- Baking sheet
- Parchment paper
- Deep skillet
- Food processor
- Spatula
- Sieve
- Mixing bowl
- Kitchen scale
- Plastic wrap
- Refrigerator
Tips
- Cook the pineapple filling the day before and keep it in the fridge; cold filling is firmer and much easier to wrap.
- If you don't have candied winter melon, you can use all pineapple, but increase the amount of pineapple and cook it longer so the filling gets chewy enough.
- If you don't have rectangular molds, you can use small mooncake molds or tall round cutters.
Storage
The cakes keep for about a week in an airtight container at room temperature, or about two weeks in the fridge. Let chilled cakes come back to room temperature for about half an hour before eating so the crust softens again.
Common problems and how to fix them
- The crust cracked and the filling burst out during baking.
- The crust was too dry or wrapped unevenly. Keep the dough cool but not too cold, and check that the crust covers the filling evenly before pressing it into the mold.
- The filling ran and made the crust soggy.
- The filling wasn't cooked dry enough. Cook it until it gathers into a mass on its own, and let it cool completely before dividing it into balls.
This recipe is based on the common ratios for this bake and is written entirely in our own words.