Pineapple buns
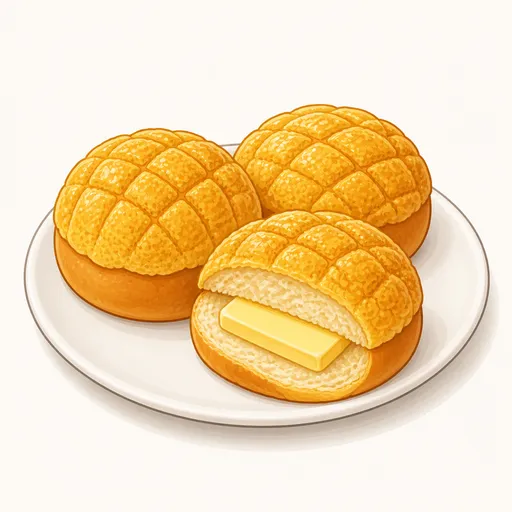
Pineapple buns are a beloved staple of Hong Kong bakeries. They get their name from the crackly, checkered crust on top that looks like a pineapple, though there's no pineapple in them at all. The sweet, crumbly butter topping contrasts with the soft, fluffy milk bread underneath, and they're best eaten while still warm.
- Difficulty
- Medium
- Prep
- 45 min
- Cook
- 18 min
- Rising or chilling
- 2 hr 10 min
- Total time
- 3 hr 13 min
- Method
- Oven-baked
Ingredients
Bread dough
Pineapple crust topping
Egg wash
Instructions
Step 1
Combine 300 g bread flour, 10 g milk powder, 45 g granulated sugar, 5 g instant yeast and 4 g salt in the mixer bowl, then pour in 50 g eggs and 150 g warm whole milk and mix on low speed. Mixing the dry ingredients first spreads the yeast and salt evenly through the flour. Stop when the dough comes together into a shaggy mass with no dry flour left.
Step 2
Knead on medium speed for about eight minutes, then add 30 g softened unsalted butter and knead for about seven minutes more. Milk bread dough needs well-developed gluten for a soft, stretchy crumb. The dough is ready when it's smooth, sticks lightly to the bottom of the bowl and stretches into a thin windowpane without tearing.
Step 3
Place the dough in an oiled bowl, cover with plastic wrap and let it rise somewhere warm for about an hour. The first rise develops the dough's flavor and airy texture. It's done when the dough has doubled in size and the underside is full of honeycomb-like air pockets.
Step 4
While the dough rises, beat 50 g softened unsalted butter with 60 g powdered sugar until light and fluffy, beat in 18 g egg yolks and 10 g milk powder, then sift in 100 g all-purpose flour and 1 g baking powder and mix into a dough. Beating the butter until fluffy helps the crust crack beautifully and bake up crisp and crumbly. The topping is ready when it's as soft as modeling clay, smooth and not sticky.
Step 5
Divide the topping into ten equal balls, wrap them in plastic wrap and refrigerate for about thirty minutes. Chilled topping is easier to roll thin and won't turn greasy as you work with it. It's ready when the balls have firmed up somewhat but still give a little when pressed.
Step 6
Punch down the risen dough, divide it into ten equal pieces, shape each into a tight, smooth ball and set them on a parchment-lined baking sheet about five centimeters apart. A taut surface helps the buns rise round and hold the pineapple crust evenly on top. They're ready when the balls are evenly round with smooth tops and the bottoms are pinched closed.
Step 7
Place each ball of topping between two sheets of plastic wrap and roll it into a thin round slightly wider than a bun, then peel off the wrap, lay it over a bun and press gently so it hugs the top half. Rolling between sheets of plastic keeps the topping from sticking and makes it evenly thin. This step is done when the topping covers each bun snugly and doesn't slide off.
Step 8
Let the buns rise for about 40 more minutes somewhere warm but not hot, uncovered. Too much heat will melt the butter in the topping. The buns are ready when they've grown to nearly one and a half times their size and the topping is starting to crack as they expand.
Step 9
Preheat the oven to 180°C with a rack in the middle when the buns have about fifteen minutes of rising left. The buns need a hot oven so the pineapple crust cracks into clear squares as soon as it meets the heat. The oven is ready when the heating light has gone off and the inside is evenly hot.
Step 10
Beat 18 g egg yolks with a few drops of water, brush it lightly over the topping, then use a knife to score very shallow diagonal lines in a diamond pattern. The yolk gives a golden sheen, and the scoring helps the crust crack into squares like the eyes of a pineapple. You're done when the tops are evenly golden and the score lines are clearly visible.
Step 11
Bake the buns at 180°C for about 15 to 18 minutes, rotating the pan halfway through if your oven heats unevenly. A moderate heat crisps the crust while keeping the inside soft and moist. They're done when the tops are a glossy golden brown, the cracks are well defined and the bottoms are evenly golden.
Step 12
Move the buns to a rack and let them cool for about ten minutes before eating. If you eat them piping hot, the crust is still soft and crumbles easily. They're ready when the crust has crisped up again, the buns feel light and the inside is soft and fluffy.
Equipment
- Oven
- Stand mixer
- Kitchen scale
- Mixing bowl
- Baking sheet
- Parchment paper
- Rolling pin
- Plastic wrap
- Pastry brush
- Refrigerator
- Wire cooling rack
Tips
- For the Hong Kong way, slice a warm bun in half and tuck a thick slab of cold butter inside.
- If you have baker's ammonia, you can use a small amount of it instead of the baking powder in the topping for a crisper crust with bigger cracks.
- Shape any leftover topping into little cookies and bake them alongside the buns.
Storage
Pineapple buns are best the day they're baked. You can keep them in an airtight container at room temperature for one to two days and rewarm them in a 170°C oven for about five minutes to crisp up the crust again.
Common problems and how to fix them
- The pineapple topping spread out and didn't crack into squares.
- The topping was too soft or the buns rose somewhere too hot. Chill the topping more thoroughly before rolling it, and proof the buns somewhere only slightly warm.
- The crust peeled away from the buns after baking.
- The topping was rolled too thick or wasn't pressed firmly enough onto the buns. Roll it thinner and smooth it gently around each bun so it clings tightly.
This recipe is based on the common ratios for this bake and is written entirely in our own words.