Walnut cakes (hodu-gwaja)
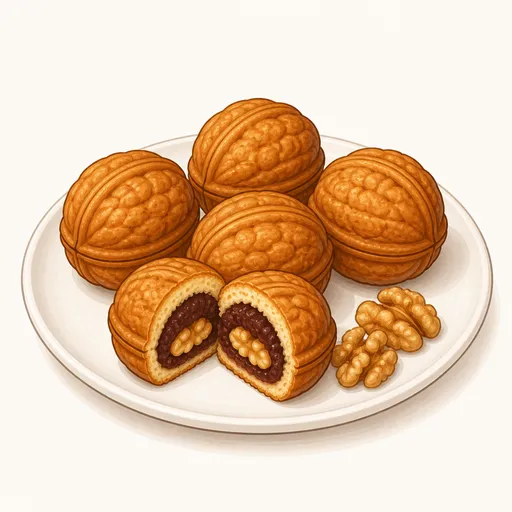
Hodu-gwaja are adorable little walnut-shaped cakes, a specialty of the city of Cheonan in South Korea and a favorite snack at highway rest stops. The shell is soft and fragrant with egg and milk, and inside you'll find sweet, mellow red bean paste with a crunchy, rich piece of walnut. They bake in a two-sided cast-iron mold, so the outside turns an even golden brown with a bumpy pattern just like a real walnut shell.
- Difficulty
- Easy
- Prep
- 25 min
- Cook
- 30 min
- Rising or chilling
- 30 min
- Total time
- 1 hr 25 min
- Method
- Pan-cooked or waffle iron
Ingredients
For the batter
For the filling
For greasing the mold
Instructions
Step 1
Whisk 100 g eggs with 60 g granulated sugar and 10 g honey, then add 100 g whole milk and 20 g melted unsalted butter. Sift in 150 g all-purpose flour, 3 g baking powder and a pinch of salt, and stir gently. Mixing just enough keeps the shells tender instead of chewy like bread. The batter is ready when it is smooth, about as thick as drinkable yogurt, with no dry lumps of flour left.
Step 2
Cover the bowl with plastic wrap and let the batter rest for about 30 minutes at room temperature or in the fridge. Resting lets the starch absorb the liquid evenly and lets the big air bubbles settle out. The batter is ready when the surface looks flat and smooth and it feels a little thicker than before when you stir it gently.
Step 3
Divide 210 g sweet red bean paste into thirty small portions and roll them into balls, then break 60 g walnuts into thirty pieces and press one piece into each ball. Having the filling ready lets you work quickly while the mold is hot. The filling is ready when the balls are all the same size, each with a piece of walnut half poking out.
Step 4
Set the walnut mold over medium heat and warm both sides for about three minutes, then brush a very thin coat of vegetable oil (to taste) into each cavity. An evenly hot mold browns the shells right away and keeps them from sticking. The mold is ready when a drop of water sizzles and evaporates immediately.
Step 5
Spoon the batter into a piping bag and pipe it into each cavity until about half full, set a filling ball in the center, then pipe a little more batter on top to cover it. That top layer keeps the filling neatly centered and helps the two halves join when you close the mold. Stop when the batter is level with the rim of the cavity and no filling shows.
Step 6
Close the mold, turn the heat down to low and cook for about two and a half minutes, then flip the mold and cook the other side for another two and a half minutes or so. Low heat cooks the batter all the way through without scorching the outside. The cakes are done when you open the mold and see both sides evenly golden brown and the cakes release from the cavities on their own.
Step 7
Transfer the cakes to a wire rack, snip off any extra batter that spilled over the edges with scissors, and let them cool for about five minutes. A short rest lets the shells set and the filling cool down a bit. They're ready when the shells feel soft and springy and the filling is pleasantly warm when you take a bite.
Equipment
- Shaping molds
- Whisk
- Mixing bowl
- Sieve
- Piping bag
- Kitchen scale
- Pastry brush
- Wire cooling rack
Tips
- Toast the walnuts in a 160°C oven for about eight minutes before using them; they'll be much crunchier and more fragrant.
- If you don't have a walnut mold, you can use a takoyaki pan or a small round cake mold with a lid.
- Instead of red bean, try a filling of mashed sweet potato mixed with a little honey for a fun new flavor.
Storage
These cakes are best while still warm. You can keep them in an airtight container at room temperature for one day or in the fridge for three days, then reheat them in a 160°C oven for about three minutes to bring back the fragrant shell.
Common problems and how to fix them
- The cakes stick to the mold and tear when you take them out.
- The mold wasn't hot enough or needed more oil. Heat the mold a little longer and brush on more oil after every two batches.
- The shells burn on the outside but are still raw inside.
- The heat is too high for the thickness of the cakes. Keep the heat low while cooking and add about one more minute per side.
This recipe is based on the common ratios for this bake and is written entirely in our own words.