Flaky durian and mung bean pastries (banh pia)
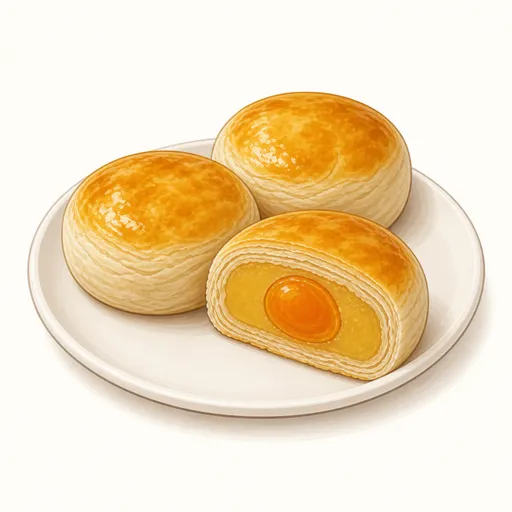
Banh pia is a specialty of Soc Trang province, with a paper-thin, thousand-layer crust that flakes off leaf by leaf as you bite, wrapped around a mung bean filling fragrant with durian and a rich, salty salted egg yolk. The secret to the crust is two separate doughs rolled and folded together to build up many layers.
- Difficulty
- Hard
- Prep
- 2 hr
- Cook
- 35 min
- Rising or chilling
- 4 hr 30 min
- Total time
- 7 hr 5 min
- Method
- Oven-baked
Ingredients
Water dough
Oil dough
Durian and mung bean filling
Egg wash
Instructions
Step 1
Rinse 200 g split peeled mung beans well, then soak them in cold water for about four hours. Soaking long enough lets the beans swell evenly and cook quickly when steamed. The beans are ready when they break apart easily when pressed lightly between two fingers.
Step 2
Drain the beans, spread them evenly in a steamer and steam over high heat for about 30 minutes. Steaming rather than boiling keeps the beans dry, so the filling cooks down faster later and does not turn mushy. The beans are cooked when they are soft and crumbly and mash smoothly with a light press of a spoon.
Step 3
Blend the hot beans with 150 g durian flesh until smooth, put the mixture in a nonstick pan with 140 g granulated sugar and 30 g lard and cook it down over medium heat, stirring constantly. Cooking it until dry helps the filling hold its shape when wrapped and keeps it from making the crust damp. The filling is ready when it gathers into a pliable mass, no longer sticks to the pan and does not stick to your fingers when you roll a bit.
Step 4
Cut 90 g salted egg yolks in half and divide the filling into twelve equal portions. Flatten each portion, place half a yolk in the center and roll it up into a sealed ball. Dividing evenly first makes the pastries the same size so they bake at the same rate. The filling balls are ready when they are round and smooth with no salted yolk showing.
Step 5
Mix 200 g all-purpose flour with 25 g granulated sugar and 3 g salt, add 60 g lard and 85 g water and knead for about ten minutes, then wrap it in plastic wrap and let it rest for 20 minutes. Thorough kneading builds gluten, so the outer crust is strong enough to roll thin without tearing. The dough is ready when it is soft and smooth, stretches into a thin film and does not stick to your hands.
Step 6
Put 150 g all-purpose flour in another bowl with 75 g lard, squeeze and smear the fat evenly into the flour by hand, then gather it into a ball. The oil dough has no water, so it develops no gluten, and this layer is what keeps the layers of crust from fusing together. The dough is ready when it is as soft as modeling clay and holds together when squeezed without any fat seeping out.
Step 7
Divide both the water dough and the oil dough into twelve balls each. Flatten a ball of water dough, place a ball of oil dough in the center and pinch the edges closed. Wrapping the two doughs together like this creates thin layers of crust as you roll. The balls are ready when they are evenly round, the seams are sealed and no oil dough is peeking through.
Step 8
Roll each ball into a long strip and roll it up, turn it upright, then roll it out long again and roll it up once more. Cover with plastic wrap and let the dough rest for about 15 minutes. Each round of rolling doubles the number of layers, and resting relaxes the gluten so the dough rolls thin easily. The rolls are ready when the surface is smooth and the spiral shows clearly at the end of each roll.
Step 9
Press each roll flat from the spiral end and roll it into a round that is thin at the edges and thicker in the center. Set a ball of filling on it, smooth the dough up to enclose it completely, then place it seam side down on a parchment-lined baking sheet and press it slightly flat. Thin edges keep the seam from forming a thick lump of crust when baked. The pastries are ready when they are round and flat, the crust covers the filling completely and there are no cracks.
Step 10
Bake the pastries at 180°C for about 15 to 18 minutes until the crust is cooked and the layers puff. This first bake dries the surface so the egg wash spreads evenly afterward. They are ready when they have puffed slightly, the crust is ivory and the layers are starting to show clearly at the sides.
Step 11
Take out the baking sheet, brush a thin layer of 20 g egg yolks over the tops and bake for another 12 to 15 minutes at 180°C. The yolk gives the tops a glossy golden color and a richer aroma. They are done when the tops are evenly golden, the bottoms are pale golden and the sides flake into layers at a light touch.
Step 12
Move the pastries to a rack and let them cool for about 30 minutes before packing them into a box. Only once all the heat has escaped does the crust turn crisp and flaky; if you box them while warm, the crust goes soft. They are ready when the bottoms are completely cool and the crust is light and flakes off in thin layers.
Equipment
- Oven
- Steamer
- Nonstick skillet
- Rolling pin
- Baking sheet
- Parchment paper
- Pastry brush
- Plastic wrap
- Mixing bowl
- Kitchen scale
Tips
- If durian is not to your taste, replace it with the same weight of steamed mung beans to make traditional mung bean banh pia.
- Lard gives the flakiest, most fragrant crust, but you can use vegetable shortening if you want a whiter crust with less aroma.
- Always keep the dough balls you are not using covered with plastic wrap, because dough that dries on the surface will crack when you roll it and wrap the filling.
Storage
Banh pia keep for about three days at room temperature in an airtight container. You can refrigerate them for up to ten days; warm them in a 160°C oven for about five minutes before eating to crisp the crust again.
Common problems and how to fix them
- The crust has no layers and is dense like a cookie.
- The oil dough was too soft or you rolled too hard, so the layers merged. Make sure both doughs are about equally soft and roll gently and evenly.
- The pastries crack and the filling leaks while baking.
- The filling was not cooked dry enough or the crust was rolled too thin on the bottom. Cook the filling longer until it no longer sticks to your fingers, and keep the center of each round thicker than the edges.
This recipe is based on the common ratios for this bake and is written entirely in our own words.