Steamed rice cupcakes (banh bo hap)
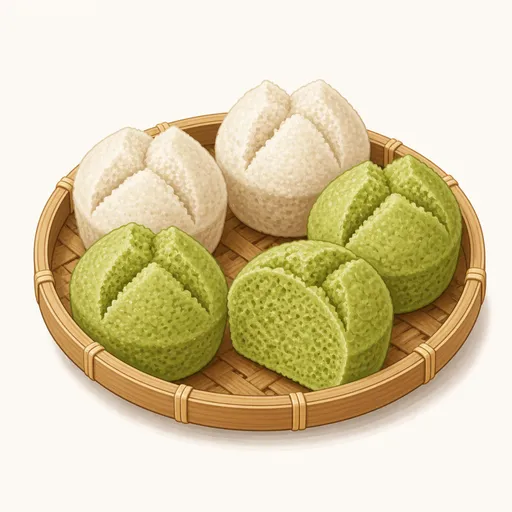
Banh bo hap are small, snow-white steamed cakes whose tops split open like a blooming rose, with a crumb full of tiny air pockets. They are soft and spongy with a slight chew and a gentle tang from the yeast, and they are delicious on their own or with a drizzle of coconut milk.
- Difficulty
- Medium
- Prep
- 30 min
- Cook
- 40 min
- Rising or chilling
- 3 hr
- Total time
- 4 hr 10 min
- Method
- Steamed
Ingredients
Batter
Coconut milk syrup
Preparing the steaming cups
Instructions
Step 1
Mix 250 g rice flour with 40 g tapioca starch and a pinch of salt, then gradually add 120 g water and knead by hand for about 10 minutes. Thorough kneading breaks down the rice flour grains so they absorb water, which helps the cakes bloom beautifully. The dough is ready when it is smooth, pliable and no longer sticks to your hands.
Step 2
Wrap the dough tightly in plastic wrap and let it rest for about 30 minutes. The rest gives the moisture time to soak evenly into every grain of flour. The dough is ready when the surface feels softer and a fingertip pressed into it leaves a slight dent.
Step 3
Put 200 g granulated sugar and 180 g water in a saucepan and heat over medium heat until the sugar dissolves, then add 120 g coconut milk, stir well and turn off the heat. The syrup must cool to just warm before you use it so it doesn't kill the yeast. The syrup is ready when it is clear, slightly thickened and only as warm as bathwater.
Step 4
Slowly pour the warm syrup into the dough, squeezing it with your hand until it dissolves into a thin batter, then sprinkle in 5 g instant yeast and stir well. Adding the syrup a little at a time lets the dough dissolve completely without lumps. The mixture is ready when it is as thin as milk with no thick patches of dough left.
Step 5
Strain the whole mixture through a fine sieve, gently pressing any leftover bits through with a spoon. Careful straining gives the cakes an even, fine crumb with small air pockets. The batter is ready when nothing remains in the sieve and the surface in the bowl looks smooth and silky.
Step 6
Cover the bowl tightly with plastic wrap and leave it in a warm place for about two and a half hours. The yeast needs time to ferment and produce gas, which is what makes the cakes rise light and spongy. The batter has proofed when the surface is covered with lots of tiny bubbles and it smells pleasantly and mildly sour.
Step 7
Add 10 g vegetable oil to the proofed batter and stir gently a few times to break up the large bubbles. The oil keeps the cakes soft and stops them from sticking to the cups, while stirring gives the crumb evenly sized air pockets. The batter is ready when only small bubbles remain on the surface and the oil is fully mixed in.
Step 8
Bring the water in the steamer to a rolling boil, brush the small cups with a little vegetable oil (to taste) and set them in the steamer to heat for about three minutes. Hot cups make the batter bubble as soon as it goes in, so the tops bloom open. The cups are ready when they feel very hot to the touch and are beaded with steam.
Step 9
Stir the batter again, pour it into the cups until about nine tenths full, then cover with a towel-wrapped lid and steam over high heat for about 12 minutes. High heat and strong steam make the tops burst open into a flower shape. The cakes are done when the tops have split into several petals, the crumb looks translucent white and a toothpick comes out clean.
Step 10
Lift out the cups, let them cool for a few minutes, then run a bamboo skewer gently around the inside of each cup to release the cakes. As they cool slightly, the cakes shrink a little and come away from the cups more easily. They are ready when they are evenly round with blooming tops and a crumb full of small air pockets when you break one open.
Equipment
- Steamer
- Small cup molds
- Small saucepan
- Whisk
- Sieve
- Mixing bowl
- Kitchen scale
- Plastic wrap
Tips
- In cold weather, you can proof the batter in a switched-off oven with a cup of hot water inside so the yeast works faster.
- Wrap the steamer lid in a clean towel so condensation doesn't drip onto the cakes, which would leave pits and stop them from blooming.
- For colorful cakes, divide the batter after proofing and stir a little pandan juice or magenta plant leaf water into each portion.
Storage
These cakes are best while still warm or on the day you make them. You can keep them in an airtight container in the fridge for two days; just steam them again for about three minutes and they will be soft and spongy as if freshly made.
Common problems and how to fix them
- The tops don't split open; the cakes just puff up round and then sink.
- The batter wasn't proofed enough or the steaming heat was too low. Proof until the surface is covered in bubbles, and always steam over vigorously boiling water in preheated cups.
- The cakes taste harshly sour.
- The batter proofed for too long or somewhere too warm. Next time, shorten the proofing time and check the batter after about two hours.
This recipe is based on the common ratios for this bake and is written entirely in our own words.