Baked mooncakes
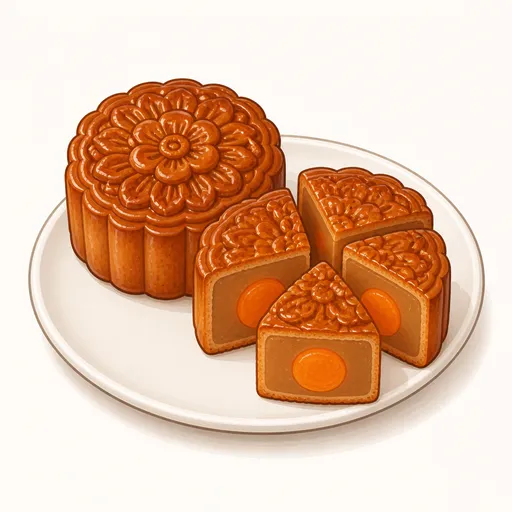
Baked mooncakes have a thin, chestnut-brown crust stamped with crisp patterns, wrapped around smooth lotus seed paste and a salted egg yolk as round as the full moon. The crust is made with mooncake invert syrup, so after a day or two it softens and turns glossy with oil, and that is when the cakes taste their best.
- Difficulty
- Hard
- Prep
- 1 hr 30 min
- Cook
- 30 min
- Rising or chilling
- 26 hr
- Total time
- 28 hr
- Method
- Oven-baked
Ingredients
Crust
Lotus seed and salted egg yolk filling
Egg wash
Flour for dusting the mold
Instructions
Step 1
Stir 120 g invert sugar syrup with 3 g alkaline water and 45 g vegetable oil, then sift in 170 g all-purpose flour and fold with a flat spatula until no dry flour remains. The alkaline water neutralizes the acidity of the syrup, helping the crust brown beautifully and stay soft. The dough is ready when it is soft, slightly sticky and a light molasses brown.
Step 2
Wrap the dough tightly in plastic wrap and leave it at room temperature for about two hours. The rest lets the dough absorb the syrup evenly, so the crust is pliable and will not crack when you wrap the filling. It is ready when it feels as soft as clay and no longer sticks to your hands.
Step 3
Arrange 120 g salted egg yolks on a parchment-lined tray and bake at 170°C for about 6 to 8 minutes. A quick bake firms up the surface of the yolks, tames their eggy smell and keeps them from leaking oil into the filling. The yolks are ready when they look slightly shiny, feel firm to the touch and have a small ring of oil around the base.
Step 4
Divide 720 g sweet lotus seed paste into eight equal portions, flatten each one, place a yolk in the center and roll it up into a sealed ball. Weighing each portion ensures the cakes fit the mold snugly without overflowing the edges or leaving gaps in the corners. The filling balls are right when they are perfectly round and smooth with no yolk showing.
Step 5
Divide the crust dough into eight portions, flatten each one in your palm, set a filling ball on top and use your thumb to gently push the dough so it slides up gradually and encloses the filling. Pushing the dough rather than pulling it keeps it evenly thin all over. Each cake is right when the crust covers the filling completely with no holes and the ball is as round as an egg.
Step 6
Roll each ball in a thin layer of to taste all-purpose flour, brush off the excess, place it in a mooncake mold, turn the mold over onto the tray, press down firmly once and lift the mold away. The flour coating lets the cake release from the mold while keeping the pattern crisp. The cakes are right when they stand straight with square edges and every line of the pattern shows clearly.
Step 7
Mist the tops of the cakes lightly with water, then bake at 200°C for about 8 to 10 minutes to set the crust. The water dissolves any leftover dusting flour so the tops are not speckled with white. They are ready when the crust has set and the raised pattern is turning slightly golden.
Step 8
Take the cakes out and let them cool for about ten minutes, then beat 20 g egg yolks with 5 g water and brush a very thin layer over the tops. Brushing once the cakes have cooled slightly keeps the yolk from pooling in the grooves and blurring the pattern. The wash is right when the tops are slightly glossy and the grooves of the pattern are still clean.
Step 9
Return the cakes to the oven at 180°C and bake for about 10 to 12 minutes more, rotating the tray halfway through for even color. This bake cooks the crust through and gives it its signature chestnut color. They are done when the tops are deep golden brown and the sides are pale golden and bulge slightly.
Step 10
Let the cakes cool completely on a rack, then put them in an airtight container or a bag with a desiccant packet and leave them at room temperature for about a day. During this time oil from the filling seeps back into the crust, which mooncake makers call letting the oil return. They are ready when the crust is soft, lightly glossy and no longer dry or hard.
Equipment
- Oven
- Mooncake mold
- Baking sheet
- Parchment paper
- Pastry brush
- Mixing bowl
- Spatula
- Plastic wrap
- Wire cooling rack
- Kitchen scale
Tips
- To make your own lotus seed paste, cook steamed, finely blended lotus seeds with sugar and oil until the paste gathers into a ball and no longer sticks to your hands.
- A ratio of about one part crust to three parts filling gives a pretty, thin crust; beginners can use a little more crust to make wrapping easier.
- Mooncake invert syrup is best made at least two weeks ahead for ideal color and thickness, or you can buy it ready-made.
Storage
Lotus seed and salted egg yolk mooncakes keep for about a week at room temperature when sealed with a desiccant packet. You can refrigerate them for up to two weeks and let them come back to room temperature before slicing.
Common problems and how to fix them
- The cakes crack on the sides or burst their patterns in the oven.
- The crust was too dry or the oven was too hot. Let the dough rest for the full time, keep the oven at the right temperature and add a little more syrup if the dough feels dry.
- The crust is still dry and hard after two days.
- The filling was too dry to release oil into the crust, or the cakes were not sealed in an airtight container. Next time, use a softer filling and store the cakes airtight as soon as they have cooled.
This recipe is based on the common ratios for this bake and is written entirely in our own words.