Baked char siu buns
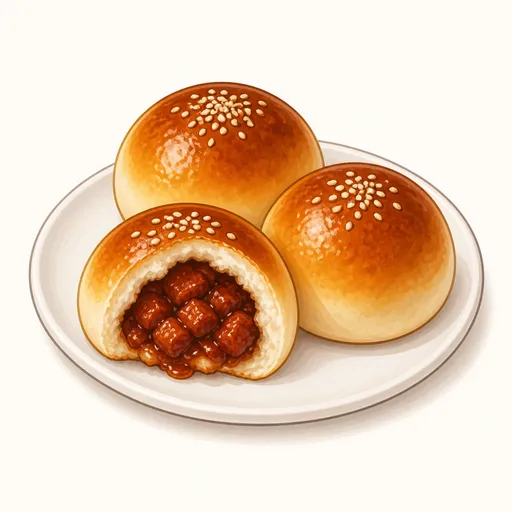
Baked char siu buns are a dim sum favorite in Cantonese teahouses, set apart from steamed buns by their golden milk bread crust glazed with shiny honey. The dough uses the tangzhong method (a cooked flour paste), so the buns stay soft and tender all day. The thick, glossy char siu filling balances savory and sweet perfectly, and they are best enjoyed with a pot of hot tea.
- Difficulty
- Medium
- Prep
- 1 hr
- Cook
- 18 min
- Rising or chilling
- 2 hr
- Total time
- 3 hr 18 min
- Method
- Oven-baked
Ingredients
Tangzhong paste
Dough
Char siu filling
Glaze
Instructions
Step 1
Whisk 25 g bread flour into 125 g water, set it over low heat and stir constantly until the mixture thickens, then transfer it to a bowl, press plastic wrap onto the surface and let it cool. The cooked paste holds much more water than raw flour, keeping the buns soft and moist for longer. The paste is ready when it is as thick as glue and the spoon leaves clear trails on the bottom of the pan, at about 65°C.
Step 2
Put 275 g bread flour, 45 g granulated sugar, 15 g milk powder, 5 g instant yeast and 4 g salt in the mixer bowl, add the cooled tangzhong, 50 g eggs and 70 g whole milk, knead for about eight minutes, then add 30 g unsalted butter and knead for seven minutes more. The tangzhong makes the dough softer and stickier than usual, so let the mixer knead for the full time. The dough is ready when it is smooth and glossy, pulls away from the sides of the bowl on its own and stretches into a thin membrane.
Step 3
Shape the dough into a ball, put it in an oiled bowl, cover with plastic wrap and let it rise somewhere warm for about an hour. Tangzhong dough rises quite quickly thanks to its high moisture. It is ready when it has doubled, the surface is round and taut and it smells lightly of yeast.
Step 4
Dice 250 g char siu pork, sauté 20 g minced shallots in 10 g vegetable oil over medium heat until fragrant, add 15 g oyster sauce, 10 g soy sauce, 20 g granulated sugar and 80 g water mixed with 10 g cornstarch and stir until thickened, then mix in the pork and 5 g sesame oil. The thick sauce coats every piece of pork so the filling is neither dry nor runny. The filling is ready when the sauce is glossy, evenly coats the meat and a spoon drawn across the bottom of the pan leaves a clear trail.
Step 5
Spread the filling on a flat plate, let it cool, then refrigerate for about 30 minutes. Chilled filling sets firm, so it is easier to wrap and will not make the dough soggy. The filling is ready when it feels cold and scoops up in neat spoonfuls without any runny sauce.
Step 6
Divide the dough into twelve pieces, roll each into a round that is thin at the edges and thicker in the middle, place a spoonful of filling in the center, then pull the edges up and pinch them shut, setting the buns seam side down on a parchment-lined tray. Thin edges keep the seam from turning thick and bready after baking. You are done when all twelve buns are evenly round with no filling showing.
Step 7
Cover loosely with plastic wrap and let the buns rise for about 40 minutes more, preheating the oven to 180°C in the meantime. Properly proofed buns have a light, fluffy crust and will not crack in the oven. They are ready when they have grown to about one and a half times their size and a gentle press leaves a dent that springs back slowly.
Step 8
Beat 50 g eggs and brush two thin coats over the buns, then sprinkle 5 g white sesame seeds in the center if you like. Two thin coats of egg give a more even golden color than one thick coat. You are done when the tops are completely covered with egg and no drips pool around the base of the buns.
Step 9
Bake on the middle rack at 180°C for about 15 to 18 minutes, until the buns have risen nicely round. Moderate heat bakes the crust golden while heating the filling through evenly. They are done when the tops are a glossy chestnut brown and the bottoms are evenly golden.
Step 10
Thin 20 g honey with a few drops of warm water and brush it over the buns as soon as they come out of the oven, then let them rest on a rack. The honey makes the crust shine and adds the gentle sweetness typical of dim sum shops. They are finished when the tops are glossy and slightly sticky to the touch.
Equipment
- Oven
- Stand mixer
- Small saucepan
- Nonstick skillet
- Kitchen scale
- Mixing bowl
- Baking sheet
- Parchment paper
- Pastry brush
- Plastic wrap
- Refrigerator
- Wire cooling rack
Tips
- If you have no ready-made char siu, marinate pork shoulder in char siu sauce overnight and roast it in a 200°C oven for about thirty-five minutes.
- You can make the filling the day before and keep it in the fridge; an overnight rest makes it thicker and easier to wrap.
- Brush on the honey while the buns are still hot so it melts into a thin layer and soaks evenly into the crust.
Storage
Wrapped well, the buns keep for one day at room temperature and three days in the fridge. You can freeze them for up to a month, then reheat them in a 170°C oven for about ten minutes or in the microwave for about thirty seconds.
Common problems and how to fix them
- The seams burst open and the filling spills out.
- Oil from the filling got on the edges of the dough, so they would not stick. Keep the edges clean while wrapping, pinch them firmly and always place the buns seam side down on the tray.
- The bottoms of the buns are wet and soggy.
- The filling was still warm or too saucy when you wrapped the buns. Cook the sauce thicker and chill the filling completely before wrapping.
This recipe is based on the common ratios for this bake and is written entirely in our own words.