Jam thumbprint cookies
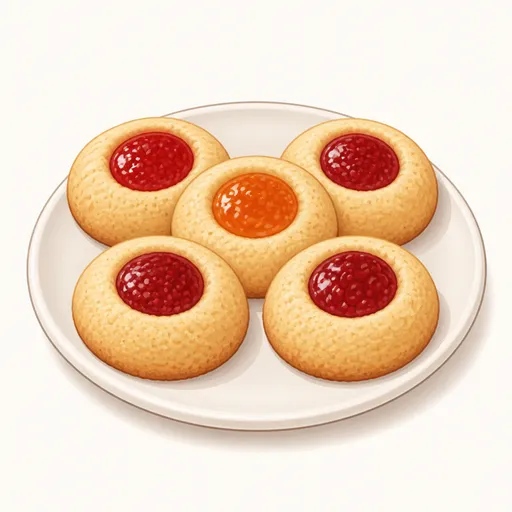
Jam thumbprint cookies are round butter cookies with a dimple pressed into the middle with your thumb, then filled with fruit jam. The cookie is crisp and tender and melts gently in your mouth, while the jam in the center bakes up chewy and glossy like a little jewel. Use strawberry, raspberry or apricot jam, whichever you like best.
- Difficulty
- Very easy
- Prep
- 30 min
- Cook
- 14 min
- Rising or chilling
- 30 min
- Total time
- 1 hr 14 min
- Method
- Oven-baked
Ingredients
For the cookie dough
For the jam filling
Instructions
Step 1
Put 225 g unsalted butter softened at room temperature in a bowl with 100 g granulated sugar and a pinch salt, and beat with a mixer on medium speed for about three minutes. Creaming the butter with the sugar creates tiny air bubbles that make the cookies light and tender. The mixture is ready when it turns pale cream in color and looks as smooth as whipped cream.
Step 2
Add 36 g egg yolks and 5 g vanilla extract to the butter and keep beating on low speed until combined. Yolks make the cookies rich and bind the dough without the need for whites, which would make the cookies harder. Stop when there are no yellow streaks left on the sides of the bowl.
Step 3
Add 260 g all-purpose flour to the bowl and use a flat spatula to smear and mix until the dough comes together in a soft mass. Mixing by hand instead of with the mixer keeps the gluten from developing too much, so the cookies stay crisp and tender. The dough is ready when it holds together without crumbling when squeezed and doesn't stick to your hands.
Step 4
Wrap the dough in plastic wrap, press it into a flat rectangle and refrigerate for about thirty minutes. Chilling the butter in the dough helps the cookies keep their round shape and keeps the dimples from filling in as they bake. The dough is ready when it feels firm but you can still press a finger into it.
Step 5
Heat the oven to 175°C and line two baking sheets with parchment paper while the dough rests. A fully hot oven from the start bakes the cookies evenly so the bottoms don't come out pale. The oven is ready when the heating light has turned off and stayed off for a few minutes.
Step 6
Divide the dough into balls about the size of a small lime, roll them smooth between your palms, arrange them about four centimeters apart on the baking sheets and use your thumb to press a deep dimple into the middle of each. The dimple needs to be deep enough to hold the jam without it spilling over as it melts. The cookies are ready when the edges are only slightly cracked and the wells are about one centimeter deep.
Step 7
Stir 120 g fruit jam until soft and smooth, then use a small spoon or a piping bag to fill each dimple. Loosened jam flows evenly into the wells and gives a pretty, glossy top after baking. Stop when the jam is level with the top of the dimple; don't overfill.
Step 8
Bake one sheet at a time on the middle rack at 175°C for 12 to 14 minutes. Butter cookies should come out while still pale to keep their buttery aroma and tender crispness. They're done when the bottoms and edges are just turning pale golden and the jam in the center is gently bubbling.
Step 9
Leave the cookies undisturbed on the baking sheet for about ten minutes, then move them to a rack to cool completely. Warm cookies are very soft and break easily, and the jam needs time to set. They're ready when they feel sturdy when lifted and the jam is no longer sticky to a light touch.
Equipment
- Oven
- Baking sheet
- Parchment paper
- Mixing bowl
- Hand mixer
- Spatula
- Kitchen scale
- Wire cooling rack
- Refrigerator
Tips
- If the dough balls crack a lot when you press them, let the dough sit at room temperature for a few more minutes to soften before shaping.
- Rolling the dough balls in finely chopped walnuts before pressing the dimples adds a crunchy, nutty coating that pairs beautifully with the jam.
- Thick jam with little liquid holds its shape better than a runny one.
Storage
Stored in an airtight container at room temperature, the cooled cookies stay crisp for about five days; place a sheet of parchment paper between the layers so the jam doesn't stick. Shaped dough balls that haven't been dimpled yet can be frozen for up to two months.
Common problems and how to fix them
- The cookies spread flat and the dimples disappeared.
- The butter was too soft or the dough wasn't chilled. Refrigerate the shaped dough balls for another ten minutes before baking, and press the dimples again if needed.
- The jam boiled over and scorched at the edges.
- The dimples were overfilled or the jam was too runny. Next time, fill the jam only to the top of the dimple and choose a thicker jam.
This recipe is based on the common ratios for this bake and is written entirely in our own words.