Nanaimo bars
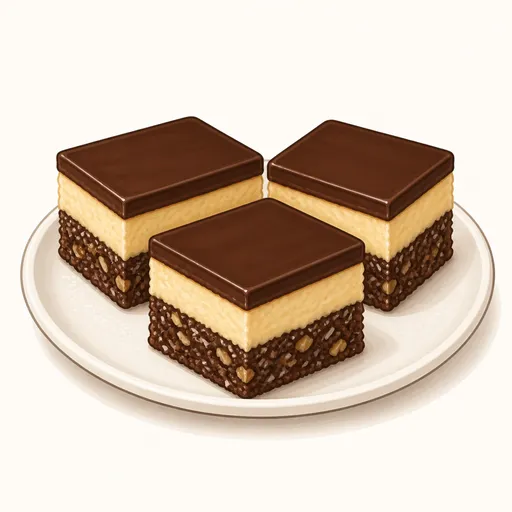
Nanaimo bars are a famous no-bake Canadian treat named after the city of Nanaimo. They have three distinct layers: a chocolate base mixed with cookie crumbs, coconut and walnuts, a pale yellow custard-flavored buttercream in the middle, and a thin layer of dark chocolate on top, sweet, rich and wonderfully indulgent.
- Difficulty
- Easy
- Prep
- 40 min
- Cook
- 10 min
- Rising or chilling
- 2 hr
- Total time
- 2 hr 50 min
- Method
- Chilled
Ingredients
Base layer
Cream filling
Chocolate topping
Instructions
Step 1
Line a 20 cm square pan with parchment paper so it covers the bottom and overhangs two sides as handles. These three-layer bars are fairly soft, and the paper handles let you lift the whole slab out to cut without breaking the layers. The pan is ready when the paper lies flat and the corners are neatly folded.
Step 2
Set a heatproof bowl over a pot of gently simmering water, add 115 g unsalted butter, 50 g granulated sugar and 40 g cocoa powder and stir until melted, then whisk in 50 g egg and stir constantly for about five minutes. The gentle heat cooks the egg slowly, keeping it safe and helping the base hold together. The mixture is right when it is thick like a sauce and coats the back of a spoon heavily.
Step 3
Take the bowl off the heat, stir in 160 g graham cracker crumbs, 70 g desiccated coconut and 50 g finely chopped walnuts, tip it into the pan and press it down very firmly with the bottom of a glass, then refrigerate for about thirty minutes. A firmly pressed base won't crumble when you cut it. The base is right when it is flat, firm and doesn't give when you press it.
Step 4
Beat 60 g softened unsalted butter with 25 g custard powder and 45 g heavy cream using an electric mixer, then gradually add 250 g powdered sugar and beat for about four minutes. Beating long enough makes the filling light, smooth and easy to spread. The filling is right when it is an even pale yellow, silky and holds its shape on a spoon.
Step 5
Spoon the filling over the chilled base, spread it evenly right into the corners with a spatula, then return the pan to the refrigerator for about thirty minutes more. The filling has to firm up first so the warm chocolate doesn't melt it. The filling is right when it feels firm to a light touch and isn't sticky.
Step 6
Melt 115 g dark chocolate with 15 g unsalted butter over a pot of hot water on low heat, let it cool for a few minutes, then pour it over the filling and tilt the pan so the chocolate flows to cover it completely. The butter keeps the chocolate softer so it doesn't crack when cut. The topping is right when it is smooth, glossy and hides the yellow layer underneath completely.
Step 7
Refrigerate the bars for about one hour, then lift them out by the paper handles and cut them into small bars with a knife dipped in hot water and wiped dry after every cut. A warm knife slices cleanly through the chocolate without cracking the top. The bars are finished when every piece shows three clear layers of brown, yellow and dark chocolate with straight, sharp edges.
Equipment
- Square pan
- Parchment paper
- Small saucepan
- Mixing bowl
- Hand mixer
- Spatula
- Refrigerator
- Kitchen scale
Tips
- Letting the chocolate topping warm up slightly for about ten minutes before cutting keeps it from cracking.
- If you don't have custard powder, you can use the same amount of instant vanilla pudding mix.
- You can swap the walnuts for almonds or pecans to suit your taste.
Storage
The bars keep for a week in an airtight container in the refrigerator, or for up to two months in the freezer. Leave them out for about ten minutes before eating so the filling softens again.
Common problems and how to fix them
- The base crumbles when cut.
- The base wasn't pressed firmly enough or the egg mixture didn't thicken. Stir the egg mixture until it is thick and press the base down very hard with the bottom of a glass.
- The middle filling mixed into the chocolate.
- The filling wasn't cold enough or the chocolate was still too hot when poured. Chill the filling longer and let the chocolate cool a bit before pouring.
This recipe is based on the common ratios for this bake and is written entirely in our own words.